
Curious about the PID autotune? Here, we tell you everything you need to know about Ender 3 PID autotune.
Want to do a PID autotune but don’t know how to do it? We can help. In this post, we tell you everything you need to know about Ender 3 PID autotune, from how to do it using the device’s built-in firmware to tuning and how it works.
How to Do an Ender 3 PID Autotune
More often than not, the PID setting is not understood. Even if it is known, it tends to be overlooked. Yet, it plays an important role in 3D printing.
When you do a PID autotune, you not only increase the overall print quality but also fine-tune your 3D printer. Not to mention doing so may fix minor temperature issues as well.
Now, the question is, how to do an Ender 3 PID autotune? The process is straightforward. Just follow the steps below.
Go to the PID settings
The first thing you need to do is to access the PID settings. From Configuration, go to Advanced Settings then to Temperature. You should see the current PID settings and the option to run an Ender 3 PID autotune on the screen.
-
Write down the current PID settings.
Before proceeding, take note of the current PID settings. We recommend writing them down. This way, you can better understand what the changes to the build surface, nozzles, or hot end do.
Also, by writing them down, you can compare the new and old numbers. This helps to ensure that updates have been made.
-
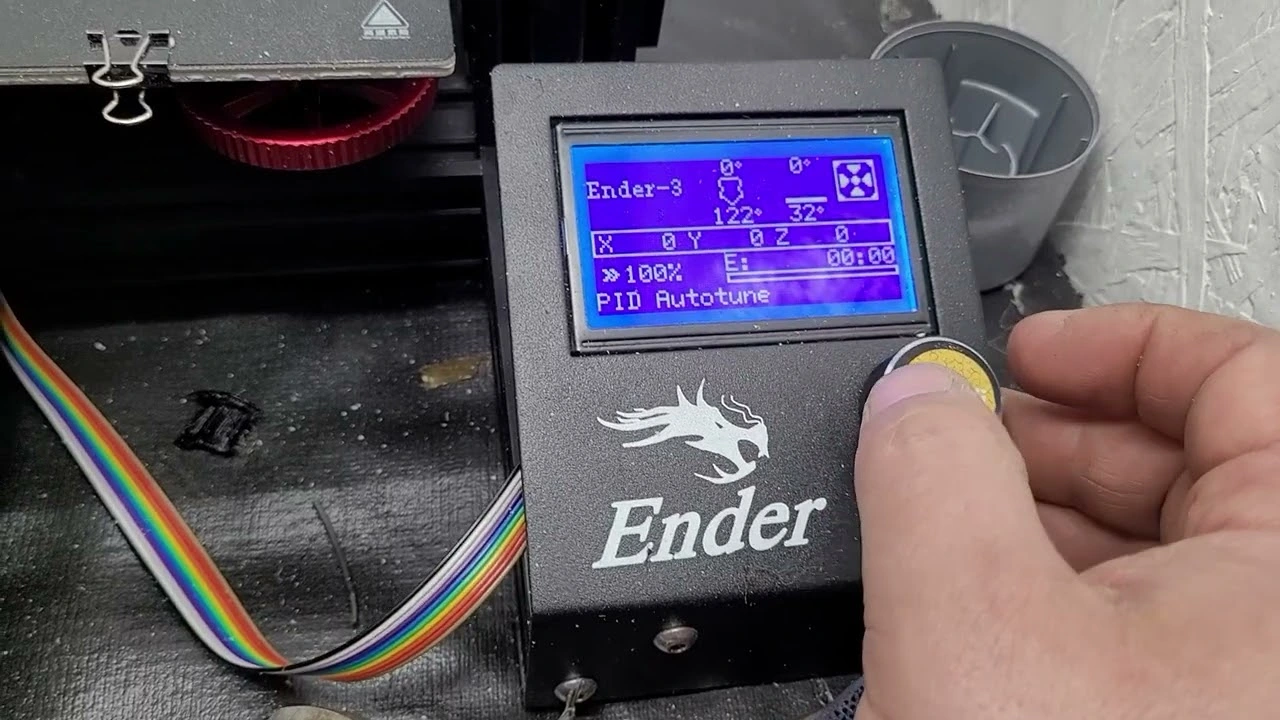
Start the PID Autotune
To Start Ender 3 PID autotune, select PID Autotune Bed for the bed or PID Autotune E1 for the Extruder. Enter the target temperature you want when prompted. We recommend calibrating the bed to 60C and the hot end to 200C.
-
Wait for the PID autotune to complete
The next thing to do is to wait for the PID autotune process to complete. No worries, it doesn’t take long. Usually, the process takes about 5 to 10 minutes.
When it is completed, the device will automatically overwrite the previous PID settings with the new ones.
-
Compare the previous and new PID settings.
Now that the previous PID settings have been overwritten, you want to compare them to the new settings. Doing so will help you understand your settings better. You will learn how the PID settings affect the heat settings, for example.
How to Do an Ender 3 PID Autotune using G-Code
The previous method works if the 3D printer has precompiled PID autotune settings in its firmware. What if your 3D printer doesn’t have it? The good news is, you can still Ender 3 PID autotune.
How you do it is, of course, different. You will need to use G-code. Just like the previous method, we will tell you how to do it step-by-step.
If your 3D printer does have a built-in PID autotune function in its firmware, we recommend using it instead of using the G-code.
To do a PID autotune using G-code, you will need an autotune G-code file and an SD card. We will tell you how to create an autotune G-code file so you only need to prepare an SD card.
Alright, without further ado, here’s how to do an Ender 3 PID autotune using G-code.
-
Create an autotune G-code file
First thing first, you need to create and run a G-code file. The file will be the one that executes a PID autotune or M303 command.
Note that you will use the same command to do a PID autotune on the bed and the hot end. The difference between the two is in the E suffix in the line of code.
- For the heated bed, the code is E-1
- For running a hot-end PID autotune, the code is E0. Keep in mind that E0 is also the code for the default setting.
There are three variables related to the PID autotune command: E, C, and S.
- E is the variable that controls which element the PID autotune is done to.
- S controls the cycle of autotune. (5 is the default, 3 is the minimum, and 8 is optimal).
- S is the one that determines the target temperature.
Copy the following code into notepad and save it as a .gcode file to the SD card.
M106 S0 ;Turn-off fan
M104 S0 ;Turn-off hotend
M140 S0 ;Turn-off bed
M503 ;Current PID Values
M303 E0 C8 S210 ;PID Auto-tune hotend
M303 E-1 C8 S60 ;PID Auto-tune bed
-
Execute the G-code file
Connect and install the SD card to the printer if you haven’t already. Then, execute the file like a normal print file.
-
Wait for the Ender 3 PID autotune process to complete.
The last thing to do is to wait for the autotune process to complete. It should take about 5 to 10 minutes.
When it is completed, the updated values will be saved to the EEPROM.
What Is PID?
The term PID, which stands for Proportional, Integral, and Derivative, refers to the setting that interprets a 3D printer’s bed and hot end temperature. It is what determines adjustments that need to be made to the printer’s temperature settings.
If the printer is a car, the PID is its cruise control. Cruise control adjusts the speed of a car to match the desired preset. Likewise, the PID adjusts the heat of a 3D printer to match the desired temperature.
The PID allows you to fine-tune your 3D printer, improve overall print quality, and prevent temperature-related errors and failures.
What Does PID Tuning Do?
It calibrates the rate at which a 3D printer heats the build plate and the hot end. It also controls the printer’s ability to maintain the desired temperatures accurately. Besides increasing overall print quality, PID tuning also reduces blobs and stringing on the print.
If you encounter these issues, a PID tune might solve them or at least minimize their likelihood of occurring. While you can do a PID tune anytime, it is especially important after you change the hot end of your 3D printer.
Where Are the PID Settings on an Ender 3?
Now you know what a PID tune is and what it does. But where are the PID settings located? You can do a PID autotune on most Ender 3V2s and Ender 3 Pros directly through their settings.
For Ender 3 Pros with the most up-to-date Creality firmware, you can do a PID autotune through their settings menu.
For extruder PID Autotune
- From Configuration, go to Advanced Settings.
- Select Temperature.
- Select PID Autotune E1, then set it to 200.
For Ender 3 PID Autotune Bed
- From Configuration, go to Advanced Settings.
- Select Temperature.
- Select PID Autotune Bed, then set it to 60.
How Long Does It Take to PID Autotune an Ender 3?
A PID autotune doesn’t take very long. The process takes only 5 to 10 minutes for each element of a 3D printer.
PID vs. Bang Bang
PID heating is more common on 3D printers and for good reason. PID heating is more accurate, which is necessary for 3D printing. PID heating adjusts the temperature as needed and does so accurately.
Bang bang heating, on the other hand, is ineffective for 3D printers due to temperature fluctuations. It works similarly to PID heating, but with much less accuracy. As such, the temperature can be too low or too high from the target temperature.
Why Is PID Tuning Important?
At glance, the values of PID may seem insignificant. However, you can’t underestimate their impact. For example, if the print bed or nozzle has a lot of temperature variations, the resulting prints may have unwanted lines.
How Does a PID Tune Work?
To put it simply, it works by adjusting the Proportional, Integral, and Derivative values on a 3D printer’s firmware. When these values are changed, the changes are saved in the device’s onboard memory. They are used for not just every print but also every action that involves heating.
While you can do a PID tuning anytime, it is especially important to do it when you get a new heated bed or hot end. By doing a PID tuning, you are more likely to get the best possible results with your new gear.
That’s how to do an Ender 3 PID autotune. You can do it using the built-in autotune settings or using the G-code if your printer doesn’t have them. Either way, doing a PID autotune is an excellent way to fine-tune your printer and improve overall print quality.

I'm Morgan, the creator of VPNForMe — a site born from too many hours spent side-eyeing sketchy VPN reviews and buffering videos.
I wanted a place where people could get straight answers about privacy, streaming access, and which VPNs actually deliver — without the hype or tech jargon.