
Have you ever seen a printing imperfection that protrudes from the rest of the print? That’s what an elephant foot is. Here, we explain what exactly an elephant foot 3D printer is, the factors that cause it to happen, and various ways to fix it.
What Is Elephant Foot?
Let’s start by getting to know about the printing imperfection. What exactly is a 3D elephant foot?
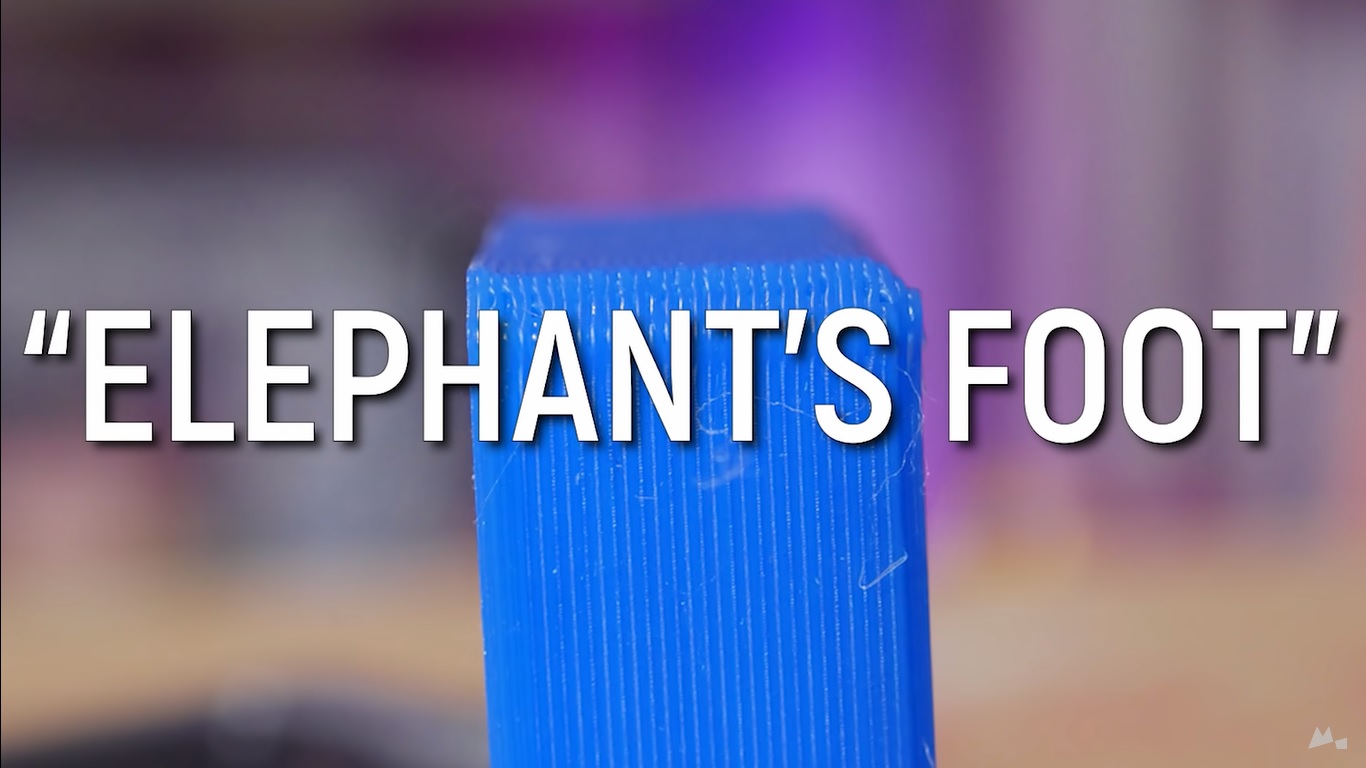
Elephant foot is a 3D printing issue. It is common and usually affects the first few layers of a print. The affected layers appear to bulge, curve upwards, or bubble, which in turn causes them to appear bigger than the successive layers of the print.
The shape of the print imperfection looks like an elephant foot, hence the name. For most people, an elephant foot is hardly an issue beyond aesthetics. It might even add charm and uniqueness to the print.
However, when the print needs to fit with other parts and/or precise dimensions are necessary, an elephant foot 3D printer is detrimental. In such cases, even a small imperfection can affect the functionality of the part. This is why it is important to know the causes and how to fix the issue.
Causes
There are multiple factors that can cause an elephant foot 3D printer. For instance, excess filament at the first layer, weight from successive layers, improper Z-offset settings, and, insufficient cooling,
Excess Filament at the First Layer
An elephant foot can occur due to the first layer having too much material. When the nozzle extrudes more filament for the first layer than is needed, some of the excesses will push out. Thus, forming the distinctive bulge of an elephant foot 3D printer.
Weight from Successive Layers
In some cases, an elephant foot is formed due to the weight from successive layers. As successive layers are printed, their weight pushes down on not-yet-cooled lower layers. The pressure forces the lower layers to extend outwards.
This is more apparent in latter or large prints, where the first layers haven’t cooled properly and has to bear a large load from the successive layers.
Weight from Nozzle
Sometimes, the weight that forces the first layers to extend outward does not come from the successive layers. Rather, it comes from the nozzle itself. This can happen due to overall bad leveling and Z-offset settings.
Insufficient Cooling
The first few layers need strength to bear the load from the successive layers. The problem is, they lack strength if they are overheated. This is why insufficient cooling can cause an elephant foot 3D printer.
How to Fix Elephant Foot

Now you know the causes. The next question is, how to fix or prevent an elephant foot 3D printer from occurring? That, of course, depends on what caused the issue in the first place.
You can try the following methods to prevent elephant foot 3D printing.
Level the Bed
The first and foremost is to level the bed. Leveling the bed can not only prevent elephant foot 3D printer but also improve bed adhesion and layer cooling. Even if there is no elephant foot, it should be a part of your regular 3D printing practice.
The goal of leveling the bed is to ensure that the distance between the print bed and nozzle is the same at all points. A level bed makes it much easier to set the Z-offset settings for the nozzle properly. Not to mention it makes bed adhesion and layer cooling more consistent as well.
To level the bed, adjust the four adjustment screws on the bottom of the 3D printer. The process is easy and should take a few minutes to complete.
Reduce Heated Bed Temperature
While a heated bed is useful for bed adhesion, it can cause insufficient cooling if not set properly. This, in turn, can result in an elephant foot 3D printer. So, what you need to do is to reduce the heated bed temperature.
By reducing the temperature, you allow the material to cool and become more rigid. With more rigidity, comes more strength. If the material is cooled properly and has developed sufficient strength to support subsequent layers, an elephant foot is unlikely to form.
Before reducing the temperature, do check the recommended bed temperature for the filament. It is likely to come in a range, which means there is some wiggle room you can take advantage of.
Reduce the temperature as needed. If bed adhesion or warping is not an issue, you can even try and go below the recommended range.
Add Raft to the Model
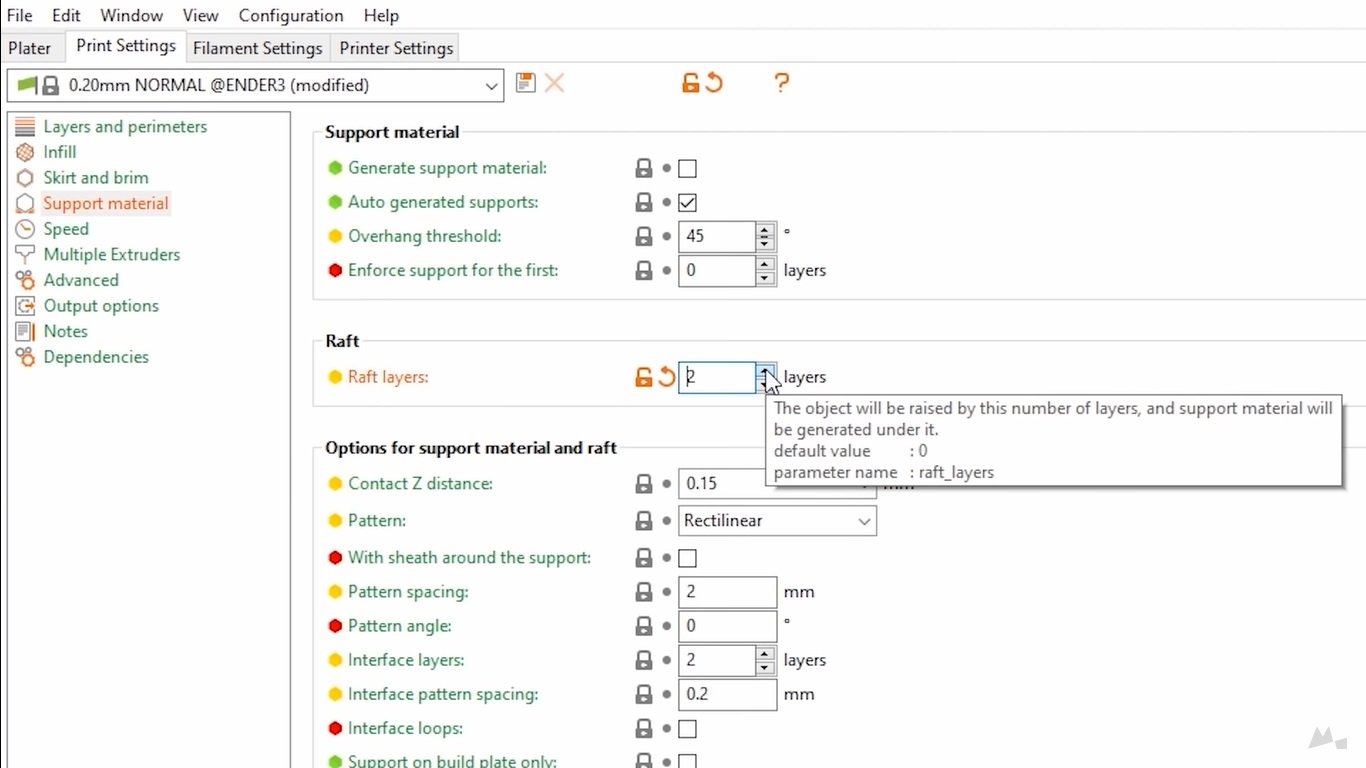
Alternatively, you can add a raft to the model. A raft is a layer of filament printed just below the base layer of the print model. It is more of a sacrificial layer than a first layer as it minimizes the chance of errors in the actual first layer.
As good as it is, many consider using a raft as a last resort, and for good reason. While a raft does minimize errors, it needs a significant amount of filament to make. Plus, it will be disposed of after the printing is finished.
It is certainly helpful in preventing an elephant foot 3D printer, yes, but it is not practical if you want to 3D print many models. It doesn’t address the root cause of the print defect, either.
Use a Chamfer for the Print
You can minimize errors by using a chamfer, too. Unlike a raft, it doesn’t need extra filament to make. A chamfer is a 45-degree slope that you can add to the first few layers of the model.
The shape of a chamfer makes the base layer narrower. The idea is that, as the base layer swells, it will become its ideal size.
Why the 45-degree? Well, a 45-degree angle is ideal because it narrows the base layer and at the same time prevents the print from collapsing due to the narrowness.
Since you are 3D printing with smaller layers when using a chamfer, you might end up using less filament than you normally would. The downside is that you will need to figure out how much the base layer will swell, which requires a bit of trial and error on your part.
Adjust Z-offset
In some cases, an elephant foot 3D printer is simply the result of an improper Z-offset setting. Incorrect Z-offset settings can cause too much compression on the base layer, which results in an elephant foot.
If you have tried leveling the bed and reducing the bed temperature but the issue persists, you may need to adjust the Z-offset settings. The Z-offset is what determines the height of the nozzle relative to the print bed as well as extrusion quality and bed adhesion.
A good way to set the Z-offset settings is by running a calibration test. Run the test and adjust the settings as needed.
Both increasing and decreasing the Z-offset settings can have an impact, so do take notes as you adjust the settings incrementally.
Use Elephant Foot Compensation
Does your 3D printer come with an automatic elephant foot compensation? If it does, use it. When the setting is enabled, it will reduce the size of the model’s first layer. Indeed, it works in a similar way to using a chamfer.
What makes it different is the printer does it automatically and there is less guesswork involved. Even if an elephant foot 3D printer does appear, you can deburr or sand the imperfection to correct it.
The problem with this solution is that not all 3D printers come with the setting. If your 3D printer doesn’t come with it, you will need to fix the error manually using the previous methods.
For most, an elephant foot 3D printer is an unsightly printing imperfection. However, in some cases, where the print needs to fit with other parts and/or precise dimensions are necessary, the imperfection can be detrimental. But now that you know how to fix it, it shouldn’t be a problem for you.

I'm Morgan, the creator of VPNForMe — a site born from too many hours spent side-eyeing sketchy VPN reviews and buffering videos.
I wanted a place where people could get straight answers about privacy, streaming access, and which VPNs actually deliver — without the hype or tech jargon.