
Knowing how to manually move ink cartridge in HP printer will be very beneficial. You can quickly diagnose the problem right away. Then solve the issue and continue printing without a hitch.
Why Do You Need to Know How to Manually Move Ink Cartridge in HP printer?
Most people don't understand why they need to have this skill. You may be worried that manually fixing the printer will break it. So you choose to bring your HP printer to the service center for a further diagnostic.
But what if you don't have time to go there? Say you need to print the document right away. But your cartridge is stuck on the right side and not moving to start printing.
There are several possibilities for why the cartridge stays in one corner. You have to diagnose the problem before moving forward and trying to fix it.
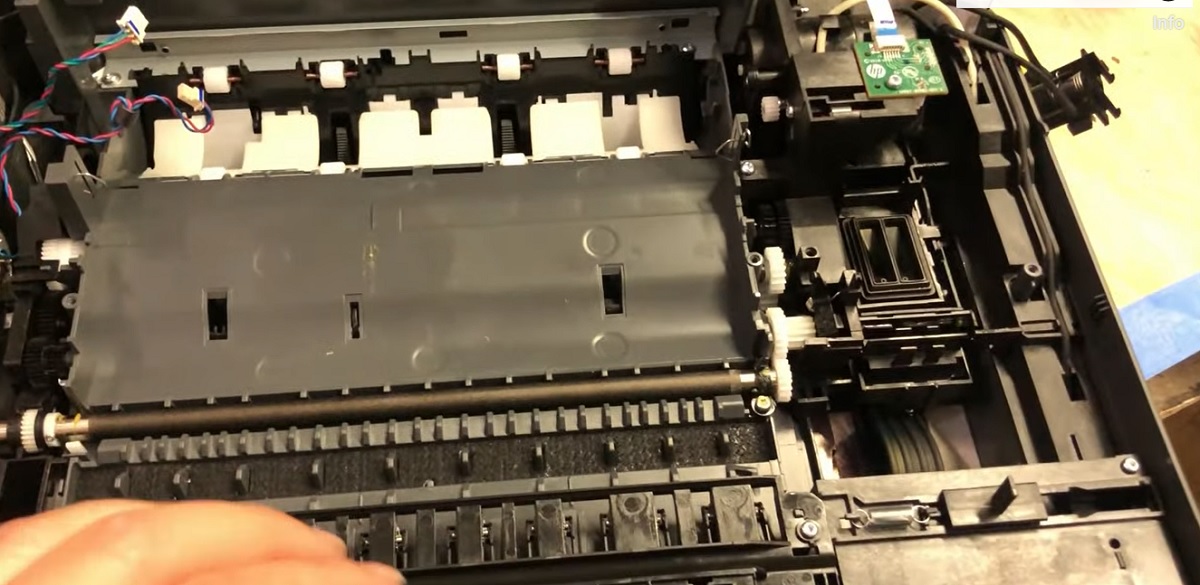
1. Check For Any Paper Jam
This is a common reason why your cartridge is stuck on the right. You may be in the middle of printing something and the feeder stops working. Don’t worry, here is how to solve your paper jam issue.
- Open the printer lid while it's still on. You will hear the whirring noise that halts the printing process.
- Gently pull the paper from the printer. Do not use any brute force or you'll leave some paper or debris inside the printer.
- Make sure that there is no paper stuck inside or anything that can block the feeder. Then close the lid and turn the printer off for half a minute.
- Turn the printer on and load the paper on the paper feeder. See if now the printer correctly loads the paper.
[irp]
2. Double-Check On The Cartridge Compartment.
You may accidentally put the cartridge improperly after replacing or refilling the ink. Therefore, the carriage is stuck on the right side.
When your printer can't read the current cartridge, these are the steps that you must do.
- Turn off your printer and remove the cartridges from your printer.
- Check if there are any build-ups or blockages on the cartridges and printer's head.
- Clean the cartridges carefully to ensure that the inks are going through the nozzle.
- Carefully install the cartridges back into the printer. Turn the printer on and see if the carriages move to the center.
3. Make Sure The Printer Tray Is Correct
Sometimes, a printer has a warped or dented section. Commonly on the gap connecting the printer with the tray.
This can happen for various reasons. It can be a factory defect or an improper installation.
Thankfully, this is a common issue that you can fix yourself. Here is how.
- Remove all paper from the printer's paper tray and turn off your printer.
- Check if your tray is straight using a ruler against the edge. You can see if the tray is dented or straight.
- If you have a dent paper tray, you will need to replace it immediately. But if your tray is straight, you can continue to the next step.
- Carefully return the tray back to the printer. Ensure that it's securely attached.
- Try closing and opening the paper tray a couple times to ensure the connection.
4. Final Steps On Solving Your Cartridge Issue
It's best if you power-drain the printer as the final step in fixing your cartridge carriage issue. You may think this is optional, but power-draining your printer will help you maintaining it for hundreds prints later.
This is crucial as it hard resets the printer and clears the current printer job. Here are five steps to power-drain your printer.
- You need to unplug the power cable from the printer when it's still turned on or in an idle position.
- Then unplug the cable cord from the electrical outlet. Let your printer rest for about a minute.
- After a minute, you can reconnect the power cable on the printer and back to the electric plug. Make sure that you don't use any extension and that it goes directly to the wall plug.
- Turn the printer on and wait until it finishes the booting process. You can tell it's idle when your printer stops making any noise.
- Finally, load a piece of paper in the tray and let the printer pull it in, and get ready. You can do a print test to see if the problem persists or if you have successfully solved it.
[irp]
I've Done All Steps But I Still Can't Print
Sometimes, you've checked the printer for a paper jam and can't find anything. You also have done the hard reset to clear the printer's task yet your printer still can't print. Remember, there are many reasons why your printer won't print.
You can check by opening the printer lid when it's still turned on. If the carriage moves to the center, you've solved your initial problem of having the cartridge stuck on the right.
However, there is a chance your cartridge carriage stays on the right. When this happens after you have done all the steps above, you need to call the nearest HP center and have them check your printer.
Can My HP printer Work With Only One Cartridge?
Sometimes, your printer cartridge carriage is stuck on one side because of a cartridge issue. It can be low on ink, or the printer doesn't recognize the cartridge and show an error message.
Unfortunately, you can't replace the cartridge before completing the print job. You don't have to worry since you can continue printing with only a single cartridge.
Some HP printer models allow you to choose if you want to use primarily black or color ink to print. To confirm, you can check on the printer preferences menu.
If your issue is on the color cartridge and you mainly use black ink. You can set your printer setup to black and white or monochrome.
You can do the same with your color ink. When you set your printer setup to print in black and white, the printer will recreate the color closest to black.
Anyway, you shouldn't make a habit out of this. Using the printer with only a single cartridge is doable but not advisable for a long period.
If you keep printing with a single cartridge, you're risking the printer for more problems. So keep using this method at a very minimum or in an emergency case.
[irp]
When Should You Call the HP Service Center?

You may want to call a professional help as soon as possible when you encounter this error. But you can relax now since you know the easy methods to solve this issue.
You may only find the diagnostic to be time-consuming. But as long as you stay calm while doing the diagnostic, you will solve the problem without any issues.
Conclusion
A cartridge carriage error is one of the common problems in any printer. In the case of an HP printer, the carriage stays at the right corner of the printer.
This issue commonly happens because of a paper jam or low ink in one of the cartridges. At any rate, it's nothing that you can't solve.
When the problem is a paper jam, you only need to remove the paper from inside the printer carefully. And if it's the cartridge, you have to make adjustments and corrections so you can continue printing.
Keep in mind that you can always call up HP service center. In case you can't solve the issues at home.
Now you know how to manually move ink cartridge in hp printer. You also can do a quick diagnosis and choose the correct solution accordingly. The best part of it is that your printer is still intact and can do the job.

I'm Morgan, the creator of VPNForMe — a site born from too many hours spent side-eyeing sketchy VPN reviews and buffering videos.
I wanted a place where people could get straight answers about privacy, streaming access, and which VPNs actually deliver — without the hype or tech jargon.