
Recently, technology has allowed us to print in 3D using a resin mold as the main material. The 3D print resin mold is the modern printing method, especially for those who are designing prototypes. If you wonder how it works, read the tutorial below as well as the limitations and advantages.
Choosing The Mold Design
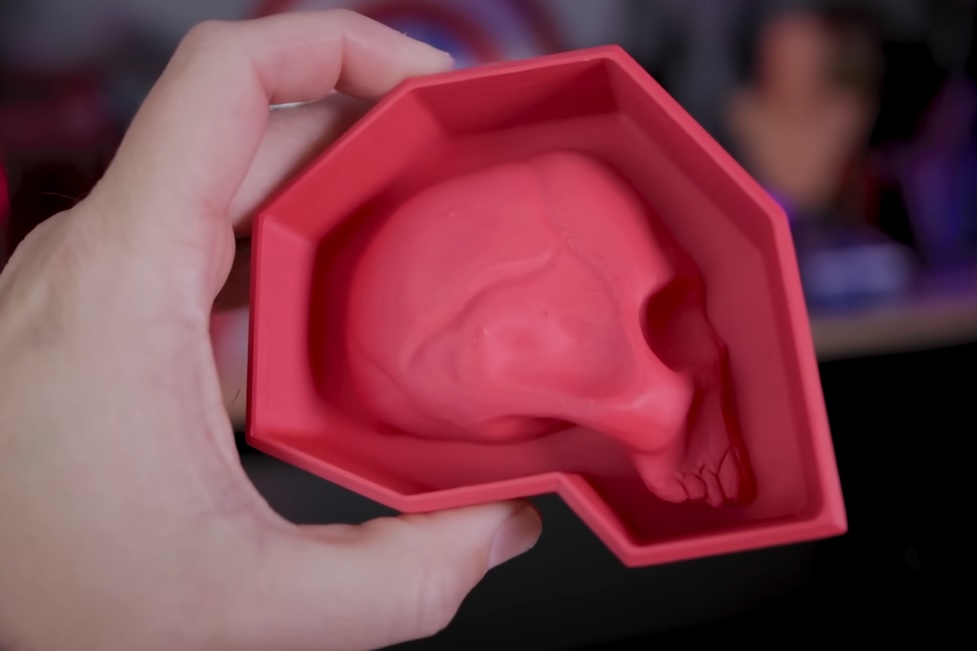
The very first step that you should do is choosing the mold. Planning the type of mold is very important because some molds are rigid and the rest is flexible. The materials will determine the printing result, so you have to pay attention to the requirements.
Mostly, the 3D print resin mold is the best choice because resin mold can act as plastics or silicone. It is fairly flexible and you can cast resin easier than other mold types. However, it also depends on the type of printer you have. Printing resin mold should be at least at the standard of an FDM printer.
Preparing Filament
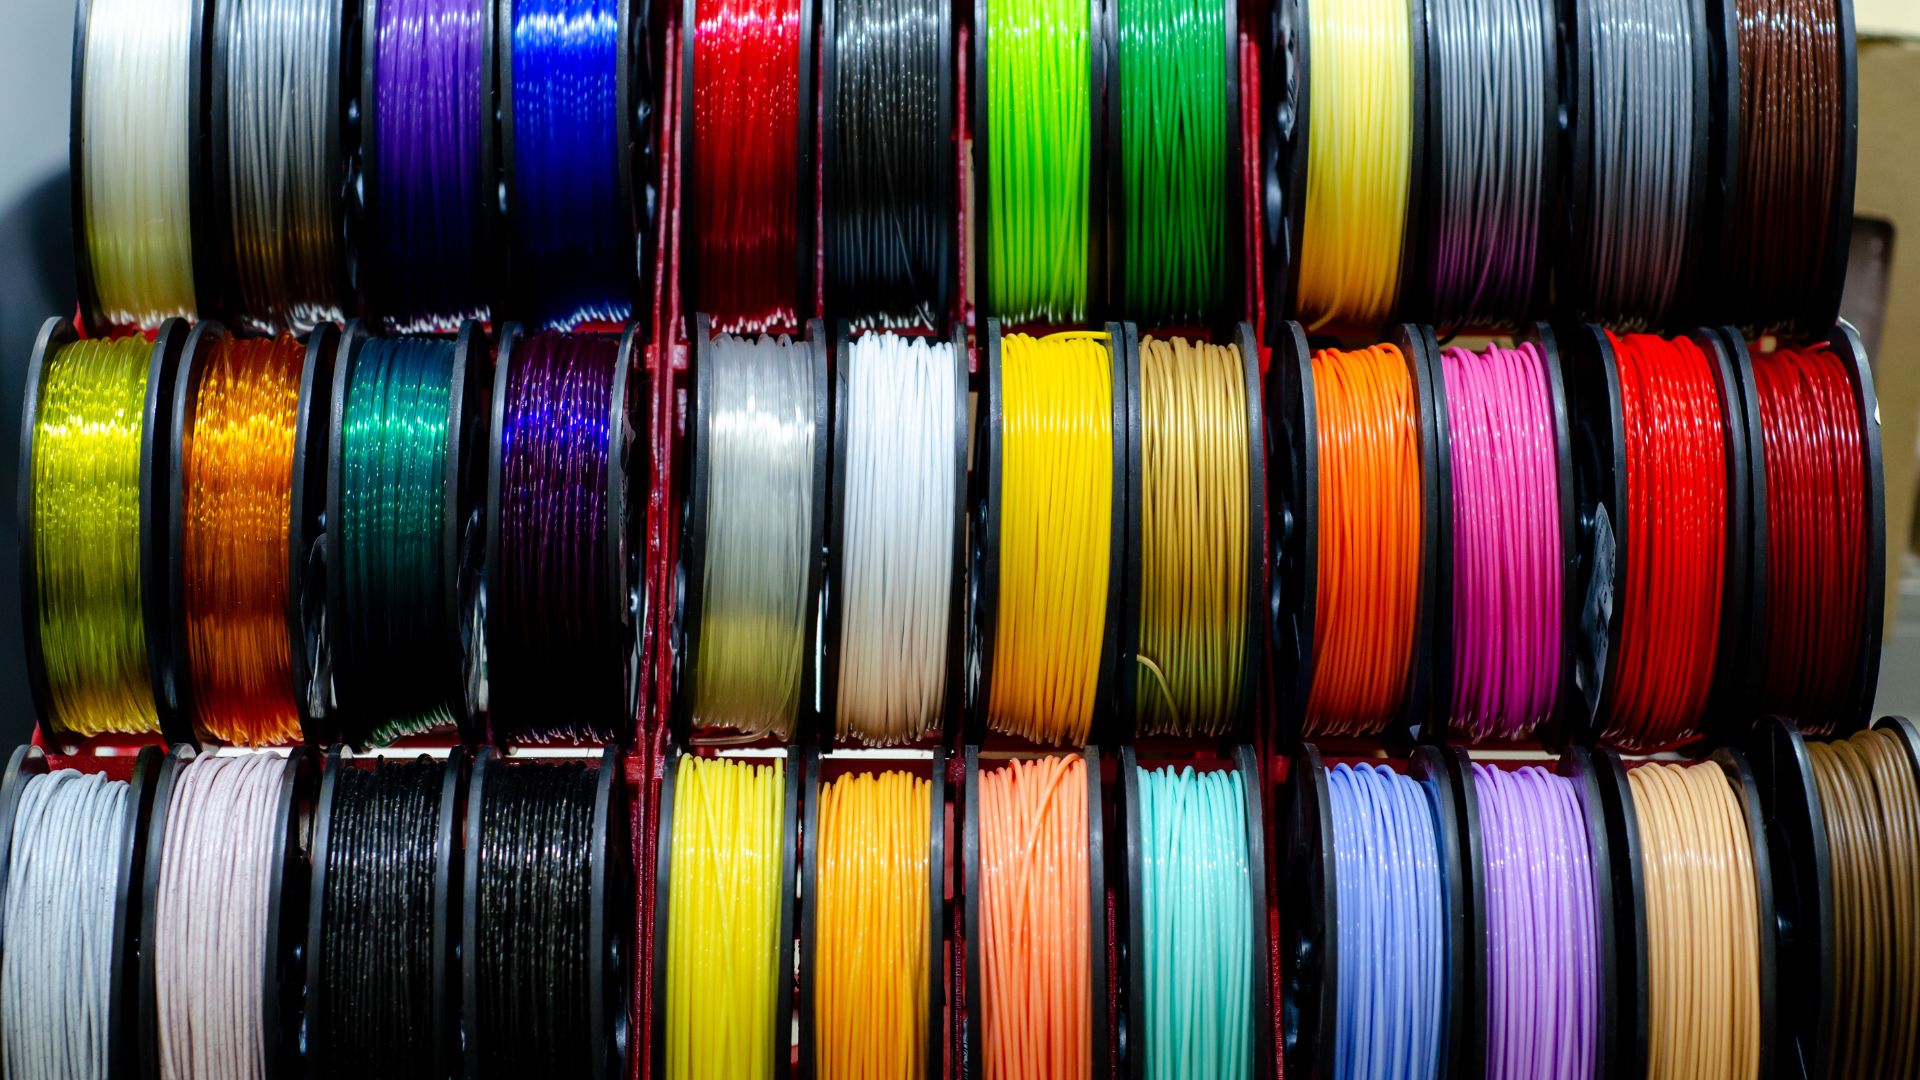
After designing the mold you will use, you have to prepare the filament type. There are many kinds to use for 3D print resin mold, such as polyethylene, TPE, and polypropylene. These materials are the best to inject mold into the printer. The risk of failure is also low for those materials.
The filaments mentioned above are also the best option because the mold lasts much longer. The result of the design is intricate and you don’t have to do many finishing processes. Injection mode in the 3D print resin mold is also the best method to have a detailed result like the actual design.
Designing in CAD
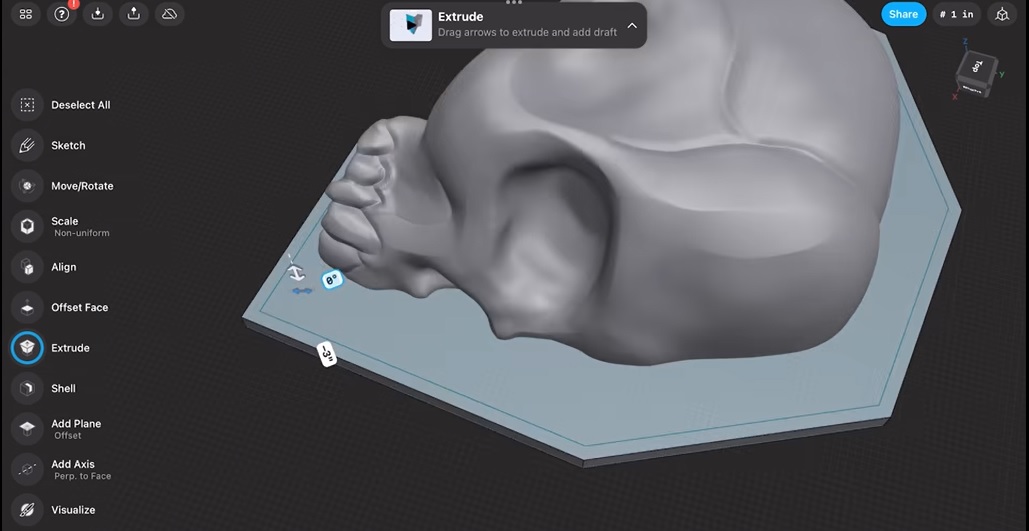
The first thing you have to do is design the mold in the CAD program. CAD is the only software to design, so you have to use this program well. There are many CAD programs that you can use and choose your favorite one. After that, you can start designing the materials.
CAD is quite flexible because it offers two kinds of injection. You can have a single injection and two parts of the injection. You can use the two-part injection because the result should be detailed, especially if the design itself is not a flat base. It should be cast on all sides of the design.
The first step of designing in CAD program is making a solid block. The solid resin mold will keep the quality to be strong even though the main material of the resin mold is flexible After that, the rest of the art should be hollow. Then, create the negative model with zero percent infill mode.
After this process is finished, you can set the combination on the object. This might take time the longest because it needs superior details. It will be different when you are going to print on the ope-faced flat. It needs a thin wall between the model and the hollow.
Watertight Designing
The most important thing when you are designing on the CAD program is making the design in watertight mode. This process is very vital because the resin will be easily damaged if it is not watertight, there might be a case where the resin will fuse to the mold and destroy it.
How to make it watertight? You have to ensure that the layer lines in your design are minimum. Second, you have to print it in the highest resolution. With this design method, you don’t need much post-processing. The details on the result are high and more delicate than expected.
Slicing The Mold
What is the purpose of slicing the mold? This process is ensuring that the details of the mold are perfect. You can cut the molds as you wish, according to the casting types that you have chosen. The slicing process needs patience and careful manners for the best result.
You can manually slice the mold. It might need a lot of time because you have to ensure that the slicing process won’t make it worse than the design. The easiest way to do this you have to put the resin mold into a slicer. The slicer, however, might not be available in all 3D print resin mold.
Printing the Mold
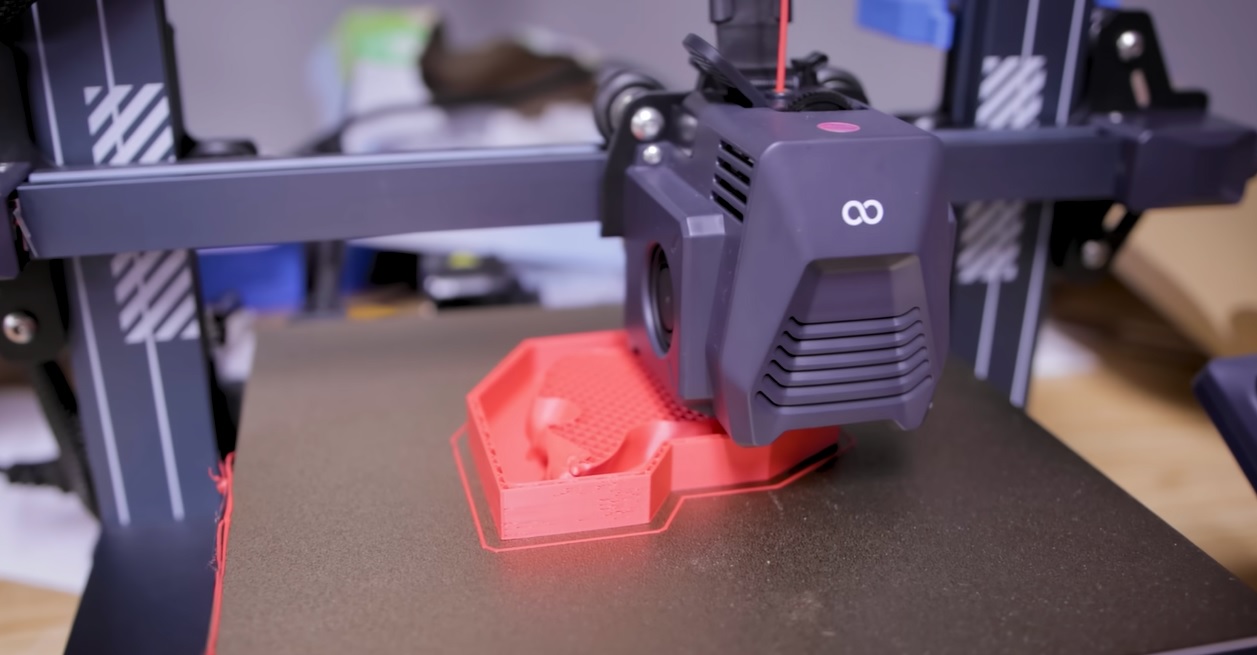
This process needs to be extra careful because this step might ruin the design. The mold should come out correctly. Follow the steps below to make it right:
-
Setting the temperature
The temperature, while you are printing the mold, should be 9 degrees Fahrenheit or 5 degrees Celcius. Setting up the temperature is vital for adhesion. If the temperature is lower or higher, the result will come out with some damage to the mold.
After that, you can increase the temperature carefully after the process is ongoing. This will melt the layers. The aftermath is the layer lines will be reduced and it increases the accuracy of the design itself. The result of the 3D print resin mold will be more delicate.
-
Monitoring the printing process
It is important to monitor the whole process of printing because you need to adjust the work and also the result. The filament might come out incorrectly. However, that case is very rare. The result is durable and seamless if the design of the mold is detailed and accurate.
Removing from Bed
Once the printing process is finished, you can remove the mold from the bed. Since the mold has been created, you can check if the spots on the mold are any. The holes in the mold should be inspected well. If you find them, you might need to undo the work because it will bring a huge mistake.
Not only spots and holes, but there might also be layer lines that you find on the mold. If you don’t plan to reprint the mold, you can use sand lightly on the mold. Usually, the sand will finish the whole mold casting. It is easier as long as the layer lines are not complex.
Preparing The Mold
This process should be extra careful as well because you will use resin in 3D print resin mold. Nowadays, you can find mold-release spray to make it work well. This material is gentle and smooth for filaments such as TPU. It does not contain any harmful agents for users or mold.
The mold-release agent is the best option that you can choose to reduce the risk of ripping mold. You can buy online from this releasing agent, and they are very affordable for the best brand. It is better than using some other sprays that might create dirt or dust on the mold.
Other Releasing-agent Options
Another thing that is worth trying is using vaseline or cooking spray that is made from canola. Some items will be very useful because it creates oily mold. However, they should be clean because the agents might ruin the mold, e.g: creating an uneven surface on the mold.
Coating The Mold
The releasing agent is not only for removing but also coating. You can spray into the mold until the spray agent drips and do it evenly to the whole area. More spray into the mold is better for the perfect coating process. Let it be for about fifteen minutes.
After the coating process finishes, you can start by clamping the mold. The clamping process is rightful if the 3D print resin mold uses injection or split mold. Clamping can use metal, wood, or other stiff materials. Just clamp it together, and the process is finished.
Getting The Resin
Choosing the best resin might not be as easy as you think. We want the best result from a 3D print resin mold, but at the same time, the excellent ones are high-cost. So, the solution is finding an affordable one yet the quality is not bad. The bad resin only causes wasting money and problems.
The bad epoxy resin usually will start becoming yellow and there are some bubbles inside the design. If the bubbles are inside the resin, it will be super challenging because they are difficult to get rid of. So, choose the professional grade for professional purposes.
You can find the resin online. The reviews under e-commerce or review websites are important for your consideration. The problems in the resin will only make you repeat to print. Choose the one which has crystal clear quality than those which are for DIY toys.
Pouring The Resin
Resin is not safe material, so you have to be careful while using this material. The material includes toxicity, so there are some ways to be safe with this to avoid poisonous cases. Some resin brands might burn your hand and skin. Follow these steps below to be safe:
- Wear gloves to be protected because your hands are the most dangerous part while pouring the resin.
- Wear goggles to prevent the heat in your eyes. The evaporated resin might affect some people and make them have severely irritated eyes.
- Wear a mask. Breathing the epoxy resin is highly dangerous. If needed, you can wear a respirator.
- Wear a laboratory coat to prevent your hand and body from contaminated materials from epoxy resin.
- Working in a well-ventilated area is the best suggestion because the air will circulate better. If needed, avoid working in the air-conditioned room and open the window of the room.
Mixing The Resin
Mixing the resin should follow the guidelines. You can check the instruction label of the epoxy resin that you have bought. The measurement should be correct because it prevents the toxic emitted into the air. After mixing the resin, you can add colors to it according to its purpose.
Mixing and pouring the resin to other places should be done very slowly to avoid bubble creation. More bubbles will cause the low quality of your design. If you find many bubbles on your design, you can take the hot gun and shoot the heat to melt the bubble.
Curing The Resin
It takes time to cure the resin. You might need more than 24 hours to allow the curing. Curing the resin has a certain purpose where the resin should be more solid, and the cast will get larger. Solid interior in the resin is important to get the best quality design.
How do you disallow them to cure in less than 24 hours? The interior part will get damaged and is not good for the final result. The wet interior brings severe damage. You have to make sure that the cast is hard. Don’t add any other materials before it is hard and solid.
Removing from The Mold
Once the resin is fully-hardened, the 3D print resin mold is nearly finished. Now, it is time to remove the resin from the mold. The best way is peeling because it will make the cast off perfectly. Don’t be too quick because the resin might be ruined and damaged. The risk of removing mold is high.
After that, you can clean the mold from the left debris and dust on it. The best agent to clean them is using a sponge and detergent. The agent should be gentle, so the resin quality will stay excellent. It is better if you use dishwasher detergent to clean the resin.
Sanding The Resin
After that, you have to sand the resin if you find some fine layers in it. It is normal because the resin will be affected because of the mold design. Sanding is the best solution because it is practical and cheap to get a better quality resin. The steps are:
- Spray the object you want to sand. It is better if you spray it with a releasing agent than water.
- Take sandpaper or coarse to sand the edge of the resin. This process needs to repeat with finer sandpaper.
- After that, take a wet cloth to make it shine and look more beautiful. Sometimes, this step is polishing the resin.
The Advantages of 3D Print Resin Mold

Faster process
For those designers who need to create prototypes, 3D print resin mold is a huge help because it accelerates the process. They do not need to relate to manual prototypes. The printer machine will work to create a design that is similar to the plan. It saves costs and time for designers.
Printing complex design
The more complex the design, the harder the process. Making prototypes manually takes weeks even months, especially with the special details. The 3D print resin mold only takes a few minutes to create the complex design. The design with geometric shapes will not be an issue anymore.
Low Error
The most important use of 3D print resin mold is that the user can avoid large errors. The error probability is lower than making the prototypes manually. The result of this printing machine is more flexible. The cost can be reduced with a shorter time to create the whole sides of prototypes.
High precision
The best part of this printer is the printing machine delivers the highest precision as result. The technique prevents high error, and you do not have to perform other printing. You can verify that the prototypes have the high quality as the plan.
The Limitations of 3D Print with Resin Mold
The size
Until now, the site has become the most troublesome part of the 3D printing resin mold. The printer only delivers small-scale prototypes. For big prototypes, it is still very expensive and the machine is still very rare. You might not be able to use this printer to design more than half of a meter.
Durability
Even though the resin has high durability compared to others, it is still losing the level of manual prototypes. It is still limited because of time. Some resin designs will get damaged over time and you cannot use the same prototype anymore in the future.
Texture
The texture of the 3D print resin mold is still low. It might not be durable, so the texture is the main problem here. For particular designs, resin might not be the best choice. At the same time, nothing is better than resin for a 3D printing system.
Quite a high cost
Since the process of printing is fast, the risk of high cost is not avoidable. Epoxy resin is quite expensive for the best brand. Meanwhile using low-grade resin only creates more trouble because the solidity is questionable. The durability is also low.
The 3D print resin mold is one of the best options to create a good prototype. It is modern, yet you only can use this machine to print small-size designs. It is faster than doing a prototype manually, and the benefits are good enough compared to the limitations it has.

I'm Morgan, the creator of VPNForMe — a site born from too many hours spent side-eyeing sketchy VPN reviews and buffering videos.
I wanted a place where people could get straight answers about privacy, streaming access, and which VPNs actually deliver — without the hype or tech jargon.