What’s the function of an estep calculator? If you have a 3D printer and you have to recalibrate it, then having the calculator can help. In most cases, using an online calculator should be enough and the process isn’t complicated. The calculator is related to 3D printer operation and function.
Estep Calculator and Its Relation to 3D Printers
3D printer is one of the best inventions of the modern century. The machine is multipurpose, easy to use and set, and it’s quite affordable. In the past, the machine might cost a fortune, but with more and more printers being offered to the market, the price has decreased within the last few years.
However, a printer is still a machine. It means that they should be calibrated regularly to make sure that the results stay accurate. And this is when the estep calibration is needed. The calibration is still related to the calculator, and we will get to that later. For now, let’s get back to estep calibration.
Estep Calibration and Its Function
So, in general, estep would refer to steps numbers that a stepper motor has to take in order to extrude a millimeter of the filament. When an extruder is poorly calibrated, the prints would likely be inaccurate. It can lead to unpleasing results, whether it is over or under extrusion. Be aware of you constantly experience printing error. In most cases, there is no obvious sign that poor extruder calibration is the actual reason for the error.
The Function of Stepper Motor
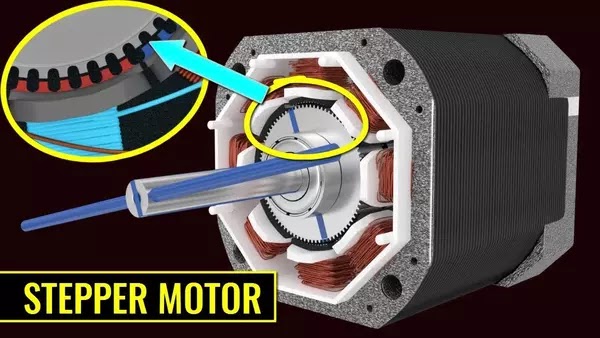
One of the most crucial elements in the 3D printer is the stepper motor. It’s basically a (phased) electric AC motor that is brushless. The main function of the part is the steps – the way the motor rotates within defined increments.
Steps are basically set positions. The rotor shaft turns primarily to be within these positions. The rotor shaft itself has a permanent magnet, surrounded by electric coils being fixed to the outer stator. When these coils are being activated (usually within a particular sequence), it would create a magnetic field surrounding the rotor. As the result, the rotor rotates aligning the magnetic field. The coils sequencing can make it rotate continuously as needed.
In a simpler word: The rotor shaft (which is basically the magnet) is designed to spin using electromagnets set, which is activated within a pattern. This pattern would determine the rotor shaft’s position and speed at any time point. This is how a stepper motor works.
3D Printing and Stepper Motor
 |
| Source: https://www.youtube.com/ [How does a Stepper Motor work?] |
The stepper motor is needed for 3D printers because of its ability to control the rotor shaft’s position precisely. Moreover, the extruder is handy to provide more control over the filament’s extrusion.
As we know, the standard (stepper) motor requires 200 steps to be able to complete one rotation. But in operation, more variables should be considered. There is a possibility that the filament may slip. Others may also contribute to the outcome error, such as too high opposing force, the current isn’t correct, or the gear (responsible for filament grip) comes in various sizes.
In 3D printer, you want to push the filament to the hot end. You also need to make sure that the filament comes in the right amount. To do so, the estep calibration should be done from time to time.
Extruder calibration basically refers to the checking action whether the extruder has extruded the right number of material during the operation or not. Esteps are basically steps numbers that the extruder needs to extrude a millimeter of the filament. When you perform extruder calibration, you must change the value so it would be correctly set.
How to Do the Calibration
Take an example of a ‘freshly’ manufactured 3D printer. Within the firmware, the printer has been managed and set to take 93 steps, along with the extruder (stepper) motor to extrude a millimeter of filament. Although the printer has been calibrated in the manufacturing factory, the accuracy would begin to fade over time because the parts wear out.
With the step calibration, you can make sure that the steps (taken by the stepper motor) and the filament (being extruded) correspond well between one another. They should be accurate too.
The calibration process isn’t exactly a rocket science. It is a pretty straightforward process. You won’t need many things (and the complicated ones). In order to determine the accuracy, you need to ‘command’ the printer to extrude around 100 mm of the filament.
You may find out inaccuracy when you measure the actual filament length (the one that got extruded). It’s possible that the length is only 95 mm, or it may be over 100 mm. if this is the case, it’s an indication that calibration is badly needed, so your extruder can be accurate, affecting the printing results. When it is accurate, the results would naturally improve.
The Estep Calculator
So, what’s the function of the estep calculator, anyway? The calculator is basically a tool that can help you calibrate your 3D printer’s estep. For the current technology, this calculator can be operated online. When you have got the new value, you can either feed it into the printer firmware or you can send a specialized command to the printer.
If you do use the specialized command, you need to save it to the printer system. If you fail to save the code into the firmware, highly likely it will revert (go back) to the firmware default, in case a reset takes place.
The online calculator is pretty simple and straightforward. There would be several slots where you need to provide the information.
How Does It Work?
The first one would be a slot to provide your current step. Find the current estep from the firmware and fill it up in this slot.
The second one would be the slot for the extrude filament. To do this, you need to:
• Disconnect and remove the extruder from its hot end.
• Feed a small length out.
• Cut it flush in the place it exits the extruder.
• Command the printer to extrude filament (the 100 mm one)
• You may have to heat the hot end up to 170 degrees Celsius (or even more) to make it to extrude. It’s due to prevention system of cold extrusion found in most firmware
The third slot would be for the figure of the actual extruded length. You can measure the extruded result with the calipers.
Once you have provided the information (these 3 major information), your new (estep) value would be automatically generated. Feel free to provide this number to the firmware and then reset the system.
Aside the new step value, you will also get serial command that you can use to change the estep. Provide this information to your printer through the serial commands. Perform a test again. By now, you should be able to get 100 mm. If not, you should re-run the calculator again.
Keep in mind that all of these numbers would be generated automatically. As long as you provide the current estep number and the extruded length, you can get the new estep value together with the serial command. No need to do any manual calculation; let the automatic digital system doing the whole work.
Manual vs Digital Calculation
In the event you want to perform the calculation by yourself, be my guest! You are free to go through countless stages of trials and errors, if you are comfortable doing it that way. Some people are comfortable doing this rather than to rely on technology because they believe human gut is more accurate and precise in delivering calibration result.
However, some people are probably more comfortable with the digital calculation. After all, it is the fastest route and you won’t have to deal with many trials and errors (don’t forget that not everyone can afford such mistakes). Simply hit the search engine and you will be directed to the right spot.
Don’t forget that the calculation for the estep calibration can be done in two ways: with Bowden Extruder and with Direct Drive Calibration. Both are basically the same. If you check the online calculator, they look similar but they are different.
However, for those who have used both methods, the Bowden Extruder is considered more precise and accurate, up to the millimeters. The result is obviously more promising and more detailed without disappointing flaws.
The Function of Estep Calculator
Everyone has their own preferences when it comes to calibrating their extruder. However, there is no doubt that having the estep calculator can be a huge help. Not only you won’t have to deal with manual method, but you can prevent doing costly mistakes and errors.
Basically, such a calculator would make your life easier. It helps you cuts off extra work of having to deal with the lengthy process. Not to mention that you can actually have faster result with a more accurate outcome. Even if you prefer the manual method, knowing that you can have such a perk is always nice and appreciated.
Calculator Differences
As it was mentioned before, accessing the digital calculator is pretty easy. You only need to access the search engine and voila! You have the access to one. But what people don’t know is that there are different mechanisms of the calculator itself.
Basically, the calculator generally implements the Bowden Extruder calibration and the Direct Drive calibration, but the process itself may be different from one website to another. It’s advisable that you should check the website first, see how the calculator functions and operates, and then you can start from there.
Before you are in a rush performing anything, always check the website first. See the calculator frame and structure, what kinds of information it needs, and then provide them all. You should be good to go.
Conclusion
Electronic devices need maintenance and care, and a 3D printer isn’t different from the rest. The biggest issue with this machine is the calibration and how you should be able to do it regularly. It may not be easy at first, but you should get the hang of it in no time. After all, you also have estep calculator to help you out, so it should be easier.


