Changing printer ink cartridges is typically a simple procedure. However, various printer brands may require you to follow different ink-change processes. You will learn how to put ink in a printer for several manufacturers such as Epson, HP, and Canon. These three printer brands are now the most popular. Most printers work similarly, making replacing a cartridge simple.

How to Put Ink in a Printer for EPSON Users
Expose the cartridge carriage
- Check to see that your printer is plugged in and switched on. To change your cartridges, turn on your printer.
- Start at the home screen of your printer to access the ink carriage. Continue to press the right arrow button until you find the “Setup” option. Click “OK.”
- Use the right arrow, navigate to the “Maintenance” option. Click “OK.”
- Press the right arrow again and scroll through the settings until you find “Ink Carriage Replacement.”
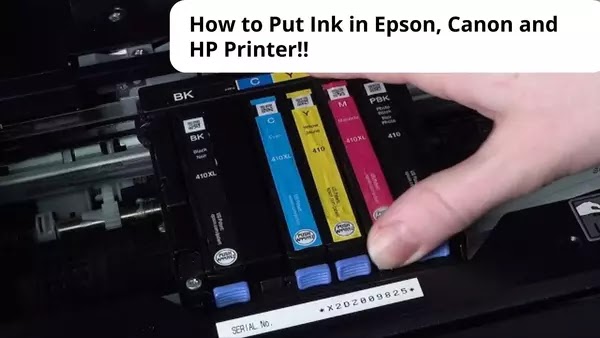
- The ink cartridges will be positioned on the right side of your open tray. This is where the replacement is positioned.
Remove Ink Cartridges
- Pinch the cartridge sides that should be replaced.
- Remove the protective tape from the new cartridge’s container.
- Shake the cartridge a few times before removing it from the container to help prime the ink. Once removed from the container, do not jiggle the cartridge as it may spill.
- Remove the ink cartridge’s protective tab. This is a plastic film that covers the ink-dispensing portion of your cartridge.
Insert the New Ink Cartridges.
- Slide the new cartridge gently into the ink slot. The tab is located on the rear.
- Insert your cartridge into the slot so that the ink nozzles are facing you.
- The color cartridges are placed on the left side. The black cartridge can be found on the right side. To confirm the cartridge is securely in place, listen for a click.
- If your Epson printer has an ink button, push it again to allow the ink supply mechanism to charge. When this is completed, the print head will automatically return to its original position.
Close the printer’s lid
- If your printer has one, press the start button. This charges the ink.
- When the door is correctly closed, the cartridges will glide back into position.
- If asked, choose OK to go on with the process.
How to Put Ink in Canon Printer
If you use a Canon printer that has a FINE cartridge, such as one from the MX or MG series, you may notice a center paper output cover above your output tray.
Open the Ink Tray
- Check to see that your printer is plugged in and switched on. Your printer must be turned on for the ink compartments to be visible.
- The ink cartridges will be positioned on the right side of your open tray. This is the position of replacement.
- The cartridge holder of some Canon printers, such as the MX or MG Series, which use FINE ink cartridges, rotates to a replacement position under the head cover. The head cover will automatically open.
- When you open the operation lid on top of a Canon PIXMA printer that uses numerous tiny ink cartridges, the cartridge holder will move into the centre of the operations tray.
Remove any Remaining Ink Cartridges
- Gently press on the ink cartridge you wish to remove.
- The cartridge will be dislodged when the cartridge lock lever clicks.
- Pull the existing ink cartridge out the rest of the way after you hear the click and see it pop out.
Replace the Cartridges
- Remove the protective tab of the cartridge. This is a rubber film that wraps the ink-dispensing portion of your cartridge.
- Avoid touching the copper-colored portion of the cartridge or the ink nozzles. If your fingertips dirty the region, it might create blockages, ink failure, or a disconnection. Also, do not jiggle your cartridges.
- Commonly Canon printers only use one black and one tri-color cartridges like in the MX printer series. Other series such as PIXMA use some cartridges, one for each color. All cartridges will be protected by a film over the ink nozzle you have to remove.
Insert your new ink cartridges
- Place your cartridge into the slot until the ink nozzles are facing you.
- The color cartridges are installed on the left side.
- Check the right side where there is the black cartridge. To confirm the cartridge is securely in place, listen for a click sound.
How to Put Ink in HP Printer
Open the ink tray in the printer’s center. A top lid of an HP Deskjet printer is used for scanning papers. A components and ink tray is located beneath the middle lid, above your output tray.
If you are using a generic cartridge instead of a genuine HP cartridge, you may want to read our other articles on how to make your HP printer accept no HP cartridge before proceeding further!
Open your ink tray.
- Test to see that your printer is plugged in and switched on. Your printer must be turned on for the ink compartments to be visible.
- Ink cartridges will appear in the center of your printer.
- To open the ink cartridges, the majority of HP printers have a top cover that you pull up.
Remove the Old Cartridges
- Press down the ink cartridge to simply remove it. This will help release it from the ink holder.
- Pull the existing ink cartridge out the rest of the way after you hear the click and see it pop out.
- Some HP printers use separate cartridges for each color. The procedure is the same if you have one of these printers. Simply pull out each individual cartridge that needs to be replaced.
Take the new cartridge from Its Packaging
- Tear the package apart to reveal the fresh cartridge.
- Unless you have separate cartridges for each hue, your cartridge will have either a blue or a black top. Your colorful ink is placed in the blue-topped cartridge while the black one is in the black-topped cartridge.
- Start by removing the ink cartridge’s covering tab. This is a film made from plastic that protects the ink-dispensing area of your cartridge.
- Do not touch the cartridge’s copper-colored surface or the nozzles of the ink. If your fingertips dirty the area, it might cause clogs, ink failure, or a discontinuity.
Put in the new ink cartridges
- Place your cartridge into the slot so that the ink nozzles are facing you.
- Your ink cartridges will have two little plastic tabs near the ink number label on the top of the cartridge. These buttons should be placed closer to you. Check that the ink nozzle is pointing away from you.
- The color cartridge is installed on the left side while the black one is found on the right side.
- When you close the door properly, the cartridges will glide back into position.
Congratulations, if you are reading to this area, you should already be successfully changing your HP ink cartridge. Don’t forget to regularly check your HP Printer Ink level to make sure you didn’t run out of ink!
If you are out of inks or cartridges, you can also check out our post on “7+ Cheapest Places to Buy Printer Ink Online for Both Inkjet and Laser Printers!!“
It’s quite frustrating when the ink is running low in the middle of printing important documents. Calling someone to help you out with the problem can take much time. It will be better if you can replace the ink on your own. It can save time and money, and the most important thing is that you can finish your office task quickly.
All of the steps about how to put ink in a printer given above are relatively simple to follow. By knowing the steps, you don’t need to worry about running out of ink when printing.