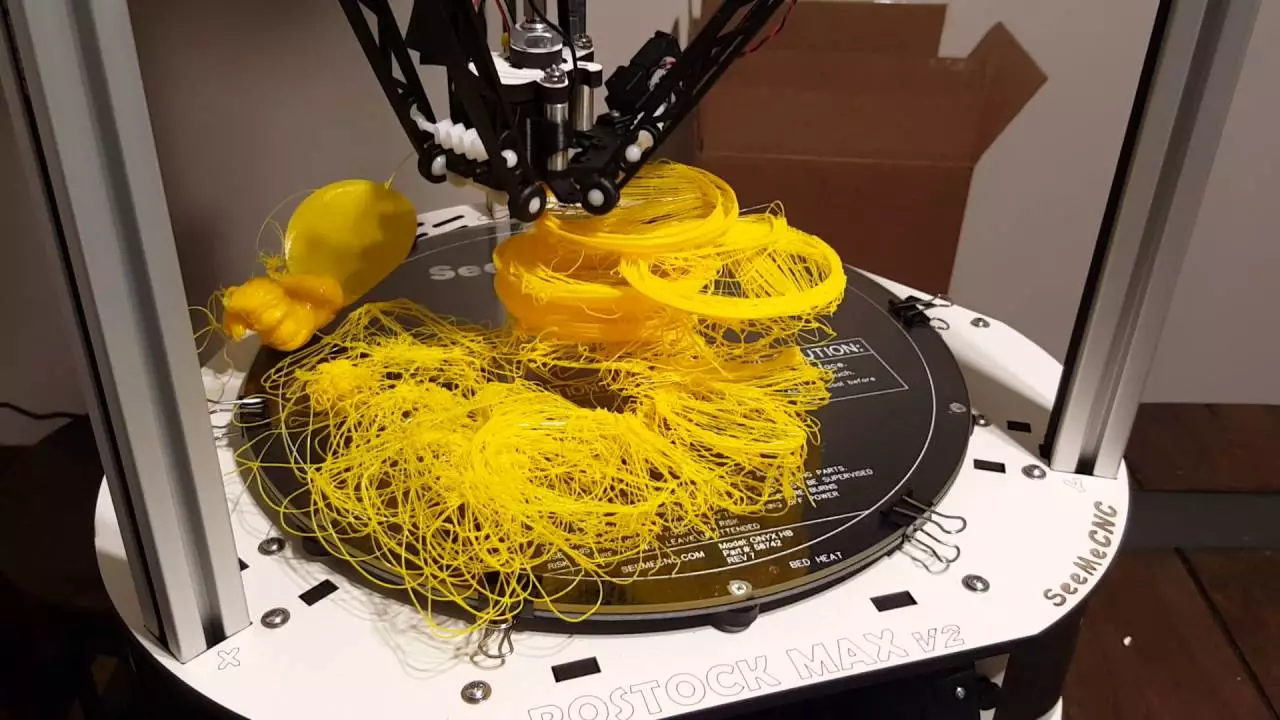
3D printing also has mistakes even when the user has set everything well. This is hard to avoid, and one of the issues that might occur is 3D print spaghetti. It is the printing issue where the result looks like spaghetti. If this issue happens to you, read this article to fix it.
9 Ways to Resolve 3D Print Spaghetti

1. Reducing The Printing Speed
One of the easiest ways to avoid the issue is by reducing the printing speed. If the speed is too fast, usually the design ends up looking like spaghetti. Check the printing speed and how you let the printer become cooler. The high temperature makes the design bond badly.
If you have a tall printer, the possibility of 3D print spaghetti is also high. Another cause is the nozzle may knock off from the position. With a slower speed, the printer machine will work better. It allows the mold to cool off first before other filaments are added.
2. Clearing The Printer Nozzle
This is another method to fix the 3D print spaghetti issue. The nozzle might have a clogged issue and you have to fix it as soon as possible. The cogged nozzle will prevent the filament from coming out well. So, the result is spaghetti printing. It only spends the cost of your printing.
There are many ways to clean the nozzle, especially eliminating the dust or debris in it. Use the brush with wire because this is the easiest way to clean it. The sign of a clogged nozzle is when the printer only prints the same pattern and ends up looking like 3D print spaghetti.
Besides the brush, you can use the needles to prevent the clogging issue in the nozzle. There is a special needle to fix this issue from light to severe clogs. Use the light to see the position of the clogs. You might need a wet cloth to put the ink on the brush or the needle.
3. Check The X and Y Axis
Another issue that might happen to cause 3D print spaghetti is the disturbance on the X and Y axis. If the belts are too loose, usually the printing results will be messy. The axis can not move well to accurately print as similar to the design.
This failure is easily noticeable, so you have to tighten the X and Y axis as soon as possible. Check both axes because usually, one is loose and another one follows. If this keeps happening, spaghetti printing will occur nonstop.
However, you have to do it correctly. If you move the belts and get to other printer components, the work of the axis won't go well. So, you have to see whether any parts of the axis touch or rub the components. This process doesn’t take too long to fix the issue.
4. Increasing The Heat
One of the methods to prevent 3D print spaghetti is by increasing the temperature. When the filament that you have chosen doesn’t melt well, the spaghetti issue will occur. For this reason, you can increase the print temperature.
You have to follow the instructions that exist from the manufacturer of your filament brand. The same material might be different because of the quality of the filament itself. The cool printing temperature is also the main cause of why the layers have poor bonds.
Besides increasing the temperature, you have to turn off the cooling setting as well. If the filament you use is sensitive to the temperature, the cool printer will delaminate the mold. Optimize the temperature to prevent the issue of 3D print spaghetti.
5. Add Another Adhesion
The additional layer which is more adhesive will work wonders for the result. The print bed will be more stable and the position of printing is good. If the molding cannot grip the bed well, the mod will move and it is knocked off from the position where it should be.
The first layer without any adhesive material will fail the bed. It is getting worse if the bed is used before and the user forgets to ensure that it is free from any dust and debris. Unsticky layers will create an unstable bed. As a result, the X and Y axis will move to the wrong positions.
Before using additional adhesive content, you have to clean the bed first. You can use a wet cloth, but ensure that the cloth will not leave any residue. The best-wet cloth is the microfiber one because the dirt will not leave on the bed anymore.
After the bed is cleaned, you can start using adhesive material on the bed. The glue or other materials will help the grip to be stronger. It doesn’t have to be on the whole bed. You can put a layer of adhesive content to the print area only.
6. Fixing Overhanging Area

Since some 3D printers are overhanging, you have to check the position. If you find them are not proper, you have to fix them. The overhanging area triggers the result of the design. If you find out that they are not supported well, give the overhanging area with the supports.
The overhanging area has a slicer. If this slicer doesn’t work well, it is hard to avoid 3D print spaghetti. Check the preview of your design first before you are printing. Should you find the support too thin, give additional support to have a better foundation.
7. Adding Density Setting
The density setting is another way to add more support to the 3D printer machine. With more density, the level of strength and durability increases up to fifty percent. It is promising because the support itself looks good. You can check the preview to see this part.
The density setting also includes the conical support. This support adds to the width of the base. As a result, the base is stronger and more stable. This useful setting can prevent the case of 3D print spaghetti. This improvement works to increase the result in general as well.
8. Repairing The Model
You can repair the 3D model as well before you are slicing the mold. This repairing method is a big help to avoid defects in the result. If the defective area is big, it means the result meets the failure. It wastes your time and also the money you spend to create mold.
Some printer machines might give you a notification before. If you still go with the printing process, 3D print spaghetti is hard to avoid. For the mild effect, your design might be cracked. Or else, the failure happens on the next printing method. Spaghetti is the worst effect.
9. Check The Tensioner Arm
The tensioner arm has a big role in 3D printing. The force of the nozzle moves to meet the nozzle and the area to plant the filament. If the grip is too loose, then 3D print spaghetti becomes the main problem that you will see on the bed.
The force should move correctly or else, the layers on the bed won’t meet another layer. As a result, spaghetti mold and resin are what you find on the printer bed. Check the grip of the tensioner arm to prevent this case from occurring.
Bonus: Checking the Stability of the Printer
It is also important to check whether the printer's condition is stable. Unstable printer machines will only ruin the result because of vibration when the printing process is occurring. So, it is better to put the printer in a place that has great stability.
Besides a stable place, you have to ensure that the printing process will not bump and shock the machine. The vibration is the reason why spaghetti printing occurs. The operation of the printer will not improve if you don’t move it to a better place.
3D print spaghetti is a problem that you can avoid and prevent. It occurs if you put the printer in the wrong place or the components are not working as they should be. Check the condition of your printer and follow the guidelines above to fix the matter.

I'm Morgan, the creator of VPNForMe — a site born from too many hours spent side-eyeing sketchy VPN reviews and buffering videos.
I wanted a place where people could get straight answers about privacy, streaming access, and which VPNs actually deliver — without the hype or tech jargon.
